- Jul 6, 2011
- 1,978
- 503
So you have a TF101 and you are thinking of Rooting or ROMing it for one reason or another.
DISCLAIMER: I am NOT responsible if you brick or destroy your device performing this procedure. It is to help users and we will help you unbrick if you do brick, but do not be mad if it does not work because you missed a step along the way.
First, please have a look through these links to understand what you are doing:
What is Rooting on Android? The Advantages and Disadvantages | Droid Lessons
Rooting yes/no/maybe/why
The biggest thing to understand is that you are taking full control of your tablet, and this also makes it easier for you to brick it, boot loop it, and also for hackers to be able to access your data on it through malware or viruses.
Proceed at your own risk!
Before you go any further, back up your data on your tablet. This includes all music, movies, documents, apps, app data, etc. I would recommend using MyBackup if you are going back to stock. My favorite is Titanium Backup
but it requires root. If you plan on going to stock rooted, you can use Titanium. If you go to Stock Unrooted, use MyBackup. Store your backups on a microSD, USB, PC or cloud storage. We are going to wipe all the data from the internal memory during this procedure.
Next, are you looking for root access on the stock ROM, or are you looking to run a custom ROM with bloatware removed, non-Asus ROM like AOSP, AOKP or CyanogenMod? Perhaps you want to get JellyBean on your tablet since it seems Asus is not in a hurry to get to it?
Well, none the less we are going to first need to install some drivers to make it work. Go to Settings - Developer Options - OK the Nag Screen and tick the USB debugging option.
Next, download the Universal Naked Drivers from XDA here: [ADB/FB/APX Driver] Universal Naked Driver 0.72 - xda-developers
Extract the zip file somewhere easy to find. I did C:\UniversalNakedDrivers\
Now that we have the Naked Drivers boot to APX mode. Attach your USB to your tablet (not the dock) and Hold VOL UP and POWER for 15-20 seconds. You should hear the new hardware found sound. It will probably fail the driver installation.
Open the Device Manager (Control Panel - System - Device Manager) and right click on the Other Devices - APX and choose Update Driver
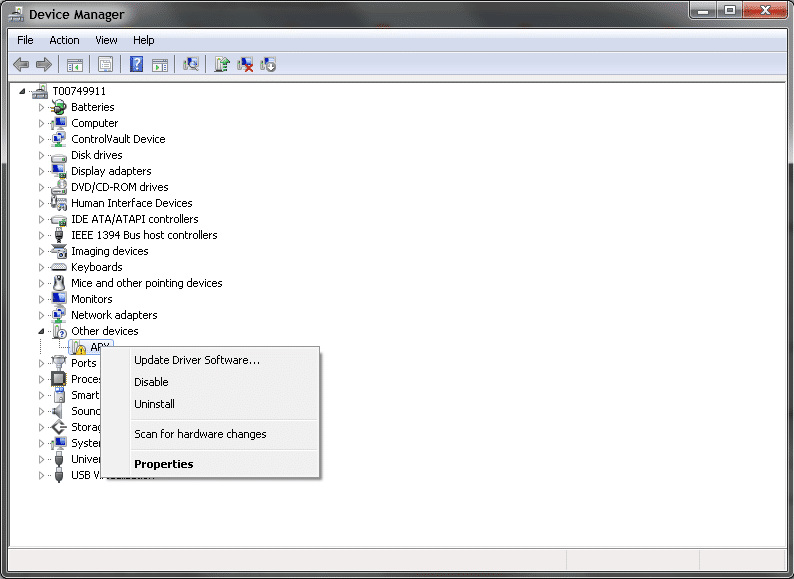
Choose Browse
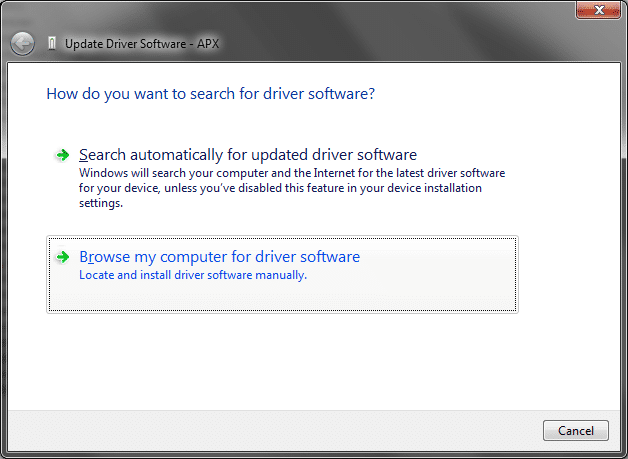
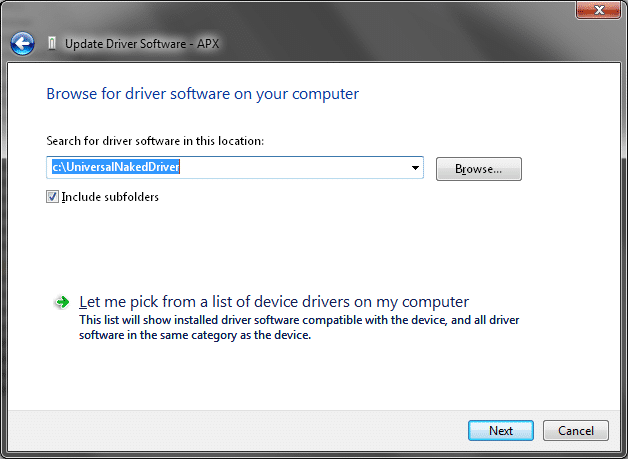
Then specify the location of the naked drivers (C:\UniversalNakedDriver)
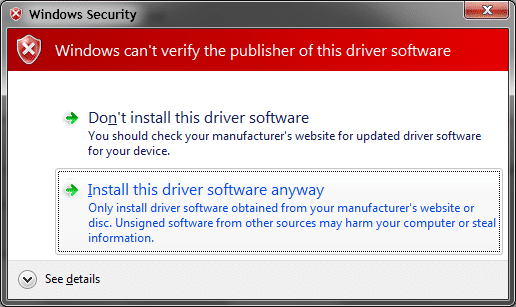
Next, you want to install this driver anyway
And the driver is successfully installed.
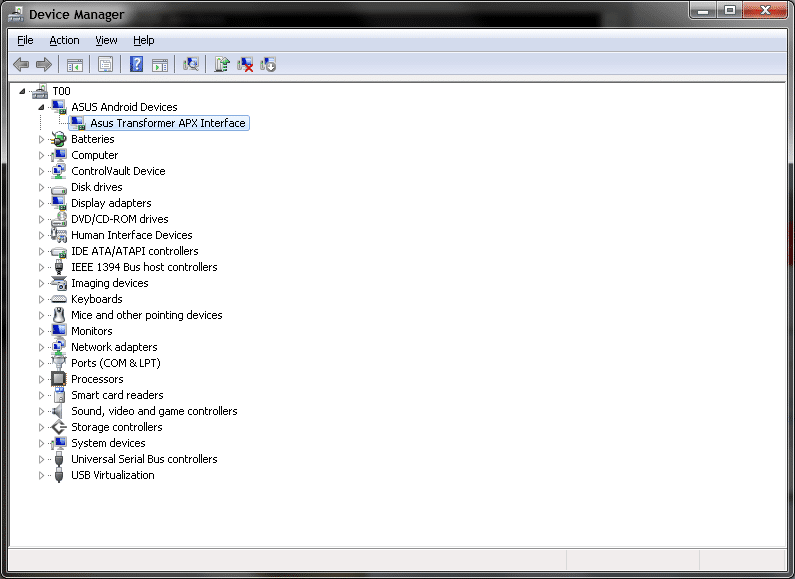
Next, we need to get the EasyFlasher from whitekidney at XDA: EasyFlasher - Install CWM/Root/unbrick in one click! [ALL TF101][NVFLASH] - xda-developers
Once you have that downloaded, extract the .zip file and open the EasyFlasher.exe
You will need to know if you have an SBKV1 or SBKV2. If you have a serial number starting with B80 and later (including C) you are SBK2. If you are B40-B60 you are SBK1. B70, some are SBK1 some are SBK2. You can try SBK1 and see if it works, if not, try with SBK2.
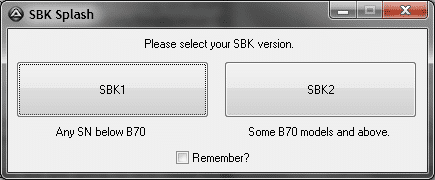
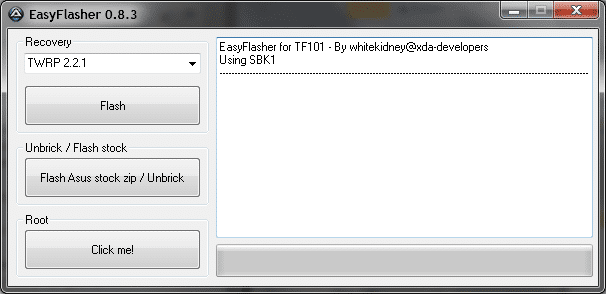
Choose the recovery you want to flash (I am going to do TWRP) and then click FLASH.
On the popup, click OK.
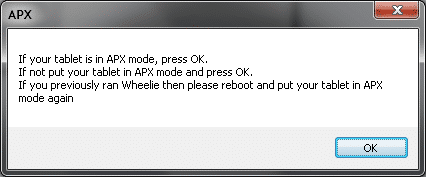
Some command prompts pop up, and some messages on your tablet will appear. It will let you know if it was successful or not.
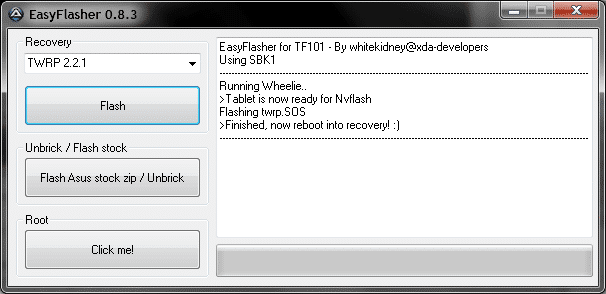
Now, to try to boot to recovery (hold VOL DOWN and POWER for 12-15 seconds. When you see white text on the screen release both and tap VOL UP)
You should see a screen like this:

Now that you have a custom recovery, it is pretty much the same process for flashing custom ROMs from here.
First option: Stock Rooted with custom recovery
Second option: Custom ROM with Custom Recovery
CUSTOM KERNELS - I am NOT going to go too deeply into custom kernels because there are A LOT of them.
DISCLAIMER: I am NOT responsible if you brick or destroy your device performing this procedure. It is to help users and we will help you unbrick if you do brick, but do not be mad if it does not work because you missed a step along the way.
First, please have a look through these links to understand what you are doing:
What is Rooting on Android? The Advantages and Disadvantages | Droid Lessons
Rooting yes/no/maybe/why
The biggest thing to understand is that you are taking full control of your tablet, and this also makes it easier for you to brick it, boot loop it, and also for hackers to be able to access your data on it through malware or viruses.
Proceed at your own risk!
Before you go any further, back up your data on your tablet. This includes all music, movies, documents, apps, app data, etc. I would recommend using MyBackup if you are going back to stock. My favorite is Titanium Backup
but it requires root. If you plan on going to stock rooted, you can use Titanium. If you go to Stock Unrooted, use MyBackup. Store your backups on a microSD, USB, PC or cloud storage. We are going to wipe all the data from the internal memory during this procedure.
Next, are you looking for root access on the stock ROM, or are you looking to run a custom ROM with bloatware removed, non-Asus ROM like AOSP, AOKP or CyanogenMod? Perhaps you want to get JellyBean on your tablet since it seems Asus is not in a hurry to get to it?
Well, none the less we are going to first need to install some drivers to make it work. Go to Settings - Developer Options - OK the Nag Screen and tick the USB debugging option.
Next, download the Universal Naked Drivers from XDA here: [ADB/FB/APX Driver] Universal Naked Driver 0.72 - xda-developers
Extract the zip file somewhere easy to find. I did C:\UniversalNakedDrivers\
Now that we have the Naked Drivers boot to APX mode. Attach your USB to your tablet (not the dock) and Hold VOL UP and POWER for 15-20 seconds. You should hear the new hardware found sound. It will probably fail the driver installation.
Open the Device Manager (Control Panel - System - Device Manager) and right click on the Other Devices - APX and choose Update Driver

Choose Browse

Then specify the location of the naked drivers (C:\UniversalNakedDriver)

Next, you want to install this driver anyway

And the driver is successfully installed.

Next, we need to get the EasyFlasher from whitekidney at XDA: EasyFlasher - Install CWM/Root/unbrick in one click! [ALL TF101][NVFLASH] - xda-developers
Once you have that downloaded, extract the .zip file and open the EasyFlasher.exe
You will need to know if you have an SBKV1 or SBKV2. If you have a serial number starting with B80 and later (including C) you are SBK2. If you are B40-B60 you are SBK1. B70, some are SBK1 some are SBK2. You can try SBK1 and see if it works, if not, try with SBK2.

Choose the recovery you want to flash (I am going to do TWRP) and then click FLASH.

On the popup, click OK.

Some command prompts pop up, and some messages on your tablet will appear. It will let you know if it was successful or not.

Now, to try to boot to recovery (hold VOL DOWN and POWER for 12-15 seconds. When you see white text on the screen release both and tap VOL UP)
You should see a screen like this:

Now that you have a custom recovery, it is pretty much the same process for flashing custom ROMs from here.
First option: Stock Rooted with custom recovery
This one is pretty simple. Copy the Superuser-3.1.3-arm-signed.zip file from the tools directory to a microSD card. Boot to recovery, go to Install, go to the External storage and select the SuperUser file. Swipe to flash, then reboot.
You are now rooted with custom recovery on the stock ROM.
It is HIGHLY recommended to use OTA Rootkeeper to backup root permissions.
When you receive and update notification, it will not install because you do not have stock recovery. You should wait until the next version is released and flash it. You may have to re-root (install recovery and then SuperUser). If you can find the incremental update file, OTA Rootkeeper should work. You may also be able to find the update with the recovery blob removed so you can keep your custom recovery. Keep an eye out at XDA in the TF101 Development Forum
Second option: Custom ROM with Custom Recovery
The biggest issue here is deciding on which ROM you want to use. There are a LOT out there. Note that 99% of the custom ROMs are already rooted. There are a few that may not be, but check the details of the thread to see if it is or is not rooted.
Here is a list as of now:
Android 4.0 ASUS Based ROMs (starts with the stock ASUS ROM and customizes it). Advantage - Stock ASUS apps like AppBackup, SuperNote and File Manager work with these ROMS. Also, the TF101G should still have 3G functionality on these ROMs.
Android 4.0 Google Based (AOSP/AOKP/cyanogen[SUP](mod)[/SUP])
Android 4.1 Google Based (AOSP/AOKP/cyanogen[SUP](mod)[/SUP])
Android 4.2 Google Based (AOSP/AOKP/cyanogen[SUP](mod)[/SUP])
And new ones pop up all the time.
Which one is best? Each person has their own best. I should not the 4.2 builds are very beta, 4.1 are quite stable and the 4.0 are rock solid as well. I did not cover 3.X builds because, well, they are ancient!
When researching a ROM, be sure to note if you have to install GAPPs (Google Apps). The Asus builds will never require GAPPs, but any cyanogen[SUP](mod)[/SUP] will ALWAYS require GAPPs. AOSP/AOKP builds are 50/50 if they are included or not. You can always get the latest GAPPs package here: Goo.im Downloads - Browsing gapps
Once you decide on which ROM you will install, place the .zip file for the ROM on a microSD card. Also place the GAPPs package if required on the microSD card.
Boot to TWRP (VOL DOWN and POWER for 12-15 seconds, release and tap VOL UP when you see the white text).
NOTE: WHEN FLASHING TO A NEW ROM IT IS BEST TO DO A WIPE OF THE CACHE, DAVLIK CACHE AND SYSTEM. FAILURE TO DO SO MAY RESULT IN AN UNSTABLE ROM DUE TO INCOMPATIBLE SYSTEM SETTINGS AND APPS. THIS EVEN APPLIES IF FLASHING AN ASUS BASED ROM LIKE REVOLVER OR ANDROID REVOLUTION HD
First, go to the WIPE section. At a minimum you will need to wipe CACHE, DAVLIK CACHE, FACTORY RESET and SYSTEM. You may also want to wipe the INTERNAL (this will still leave most of your personal files on the /sdcard/ directory). To do a full wipe, wipe the DATA section. This will remove everything in the /sdcard/ directory.
Next, go to the home screen of TWRP and go to the INSTALL section. Tap on the button for EXTERNAL STORAGE and select the ROM file. SWIPE to install it. Once complete, flash the GAPPs package if necessary.
Once this is complete, you can reboot, and you will be on your custom ROM.
Here is a list as of now:
Android 4.0 ASUS Based ROMs (starts with the stock ASUS ROM and customizes it). Advantage - Stock ASUS apps like AppBackup, SuperNote and File Manager work with these ROMS. Also, the TF101G should still have 3G functionality on these ROMs.
Android 4.0 Google Based (AOSP/AOKP/cyanogen[SUP](mod)[/SUP])
Android 4.1 Google Based (AOSP/AOKP/cyanogen[SUP](mod)[/SUP])
- ParnoidAndroid/CM10 Hybrid
- TeamEOS 4.1.1
- LiquidSmooth 4.1.2
- Gierdo's CM10
- erickwill's CM10
- RaymanFX AOSP 4.1.1 #6.0.0
- JELLYBRO AOKP
Android 4.2 Google Based (AOSP/AOKP/cyanogen[SUP](mod)[/SUP])
And new ones pop up all the time.
Which one is best? Each person has their own best. I should not the 4.2 builds are very beta, 4.1 are quite stable and the 4.0 are rock solid as well. I did not cover 3.X builds because, well, they are ancient!
When researching a ROM, be sure to note if you have to install GAPPs (Google Apps). The Asus builds will never require GAPPs, but any cyanogen[SUP](mod)[/SUP] will ALWAYS require GAPPs. AOSP/AOKP builds are 50/50 if they are included or not. You can always get the latest GAPPs package here: Goo.im Downloads - Browsing gapps
Once you decide on which ROM you will install, place the .zip file for the ROM on a microSD card. Also place the GAPPs package if required on the microSD card.
Boot to TWRP (VOL DOWN and POWER for 12-15 seconds, release and tap VOL UP when you see the white text).
NOTE: WHEN FLASHING TO A NEW ROM IT IS BEST TO DO A WIPE OF THE CACHE, DAVLIK CACHE AND SYSTEM. FAILURE TO DO SO MAY RESULT IN AN UNSTABLE ROM DUE TO INCOMPATIBLE SYSTEM SETTINGS AND APPS. THIS EVEN APPLIES IF FLASHING AN ASUS BASED ROM LIKE REVOLVER OR ANDROID REVOLUTION HD
First, go to the WIPE section. At a minimum you will need to wipe CACHE, DAVLIK CACHE, FACTORY RESET and SYSTEM. You may also want to wipe the INTERNAL (this will still leave most of your personal files on the /sdcard/ directory). To do a full wipe, wipe the DATA section. This will remove everything in the /sdcard/ directory.
Next, go to the home screen of TWRP and go to the INSTALL section. Tap on the button for EXTERNAL STORAGE and select the ROM file. SWIPE to install it. Once complete, flash the GAPPs package if necessary.
Once this is complete, you can reboot, and you will be on your custom ROM.
CUSTOM KERNELS - I am NOT going to go too deeply into custom kernels because there are A LOT of them.
What is a custom kernel? Quite simply put, it is the interface between the hardware and software.
Different kernels can enable different things. Some kernels allow you use software to set the CPU clock higher or lower than the stock levels. Other kernels allow you to enable CIFS (network shares) to be mounted in the Android file structure. Others may enable different file systems to be read like NTFS, ext3, ext4, HFS.
The trouble with going into kernels is there are a lot of them, and some are only compatible with a few ROMs.
Do some research on them to make sure it has been tested and is compatible with your ROM.
If you install a kernel that wont boot, you can simply go back and flash the ROM (and associated GAPPs if necessary), wipe the CACHE and DAVLIK CACHE and be booting again without losing any data.
